| Expand |
|---|
| title | Quick Checklist for Classroom Setup - for more detail, see articles below. |
|---|
|
| Include Page |
|---|
| Classroom Checklist |
|---|
| Classroom Checklist |
|---|
|
|
...
| Expand |
|---|
| title | General Settings: Start Here |
|---|
|
Before Your Class: | Include Page |
|---|
| Add Zoom Meeting Schedule to your eLC Course |
|---|
| Add Zoom Meeting Schedule to your eLC Course |
|---|
|
In Class Procedure: Log in to Zoom from podium PC. Start your Zoom Session for your class Check the following settings:
Participants Settings Enable - Mute participants on Entry Disable – Allow Participants to Unmute Themselves. Again, this is to prevent noise from disrupting the recording.
 Sharing Computer Sound: If you are playing a video or something else with sound from your computer and you need the participants to hear it , then enable “Share Computer Sound”.  Audio Settings: Within the classrooms, these are the appropriate selections for audio. These should be preset. If you have audio problems, please check these Zoom settings. If audio is still not working, please use the classroom control panel. Audio follows the last “pick & poke” action you took. If you used “pick & poke” to blank one of the projectors, that will also mute the audio. To enable audio, “pick & poke” a monitor to one of the projectors or the confidence monitor. Watch the video of the pick & poke interface. |
| Expand |
|---|
| title | Use Case: I typically only use the computer for class material |
|---|
|
The use case will be familiar as it is likely that you have operated in a similar fashion during the Spring Online pivot. Use “Share Screen” to provide content visibility to the students. | Include Page |
|---|
| Screen Sharing |
|---|
| Screen Sharing |
|---|
|
You can also be more open about allowing students to unmute themselves during the session as the shift in video focus will not disrupt the content you are conveying.  | Include Page |
|---|
| Record a Zoom meeting to the cloud |
|---|
| Record a Zoom meeting to the cloud |
|---|
|
|
...
| Expand |
|---|
| title | Use Case: I primarily use a Document Camera |
|---|
|
To utilize the DocCam for the Zoom session, you will need to change the source of the video feed and turn off Mirrored Image. Do this through the Zoom interface. If you need to alternate the view between the classroom camera and the Hovercam, you will need to switch back and forth between AV Bridge (classroom cameras) and the Hovercam. Watch video of switching cameras.  Also select Video Settings which will bring up this inteface:  Deselect “Mirror my video”. This will ensure that the image projected within the classroom is oriented properly for the students in the classroom. Students at a distance will see the Doc Cam image properly regardless of this setting. | Include Page |
|---|
| Record a Zoom meeting to the cloud |
|---|
| Record a Zoom meeting to the cloud |
|---|
|
|
...
| Expand |
|---|
| title | Use Case: I rely on dual monitor for contrast and comparison |
|---|
|
Unfortunately, Zoom does not record multiple monitors simultaneously. You will need to switch the screen share between the two monitors or move all applications to a single monitor and bring the windows to the front as needed for the lecture. Watch video of changing monitor in Screen Share. Watch video of switching windows focus on single monitor. | Include Page |
|---|
| Screen Sharing |
|---|
| Screen Sharing |
|---|
|
| Include Page |
|---|
| Record a Zoom meeting to the cloud |
|---|
| Record a Zoom meeting to the cloud |
|---|
|
|
| Expand |
|---|
| title | Hybrid Teaching Strategies |
|---|
|
For Fall 2020 instructions options, see this CTL guide. Flipping the classroom: lectures as pre-recorded and delivered ahead of time in eLC. In-person class time becomes project/activity time, review of “muddiest concepts,” or in-depth discussion. See examples of faculty discussing their experiences here: Hyflex: in-person courses are designed with online students in mind. A common example is a Zoom meeting (set to record) of classroom lectures or activities so that students can attend online. Ideally, both online and in-person students would be able to interact instructor/peers in real-time via the chat feature, audio, or screen share. May involve the creation of an online version specific elements in addition to in-person activity. For example, while students attending in-person will participate in a in-class discussion on a topic. Students attending online will engage in eLC discussion boards and other ways in such as VoiceThreads, Kahoot!, TopHat etc. Faculty may assign a student or TA to moderate the session. It is difficult to manage virtual and in-person student participate. If possible, a TA or student in the class should monitor the Zoom chat for any questions from virtual students.
|
| Expand |
|---|
| Expand |
|---|
| title | Teaching Outside of BLC | In |
|---|
| order to make hyflex instructions possible, you will need to have a camera, microphone, and a computer. These will ensure faculty has means to interact with the students attending the class virtually. Face-to-face classes can be streamed live and/or recorded for later playback in eLC. Review the list of non | blc classrooms being used by Terry faculty in Fall 2020 to review their current technology. Terry OIT will reach out to faculty teaching outside of BLC to assist with equipment needs.See teaching set ups and options in low-tech (no podium PC or cameras) and in fully integrated spaces with video conferencing options.
Teaching options in low tech classrooms: no pc, mics or cameras.
Watch the the video of the set up in Caldwell 102 and view the Zoom recording of the session.
Teaching options in classrooms with video conferencing capabilities
<insert video from MLC>
| Expand |
|---|
| title | Using Kaltura Classroom |
|---|
|
Note: This application is only available in BLC classrooms. This is not a synchronous tool. Students will not be able to attend the live class. This solution is meant to record the class and make it available immediately after.
FIRST STEP: Login to https://media.online.uga.edu/ and log in with Myid and Password if you are not sure you have ever used Kaltura. Doing this creates your id in the system.
In the Classroom:
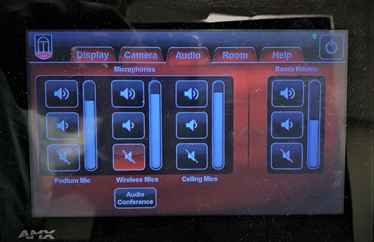 Image Removed
Camera Settings on the Touch Panel
Tap the Camera tab (see image below). By default you will see three presets.
Presenter Wide Shot
Presenter Close-up
Classroom Wide Shot
Select the preferred option. If you are recording a lecture, select Presenter Wide Shot. If you want to change an angle of the camera, zoom-in or zoom-out, double tap the Camera tab. This will show you the Camera Control on the bottom of the touch panel. Select a preset and change the settings of and use arrows to position the camera. Launch Kaltura Classroom Application to view/adjust camera angle results.
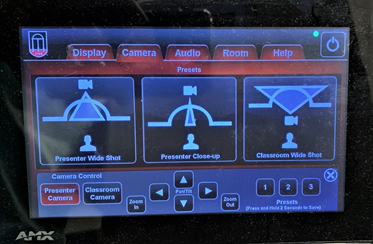 Image Removed
Launch Kaltura Classroom
 Image Removed
The Kaltura Classroom Application Homepage will load as shown below.
 Image Removed
Input Settings
There are multiple options and choices for selecting recording inputs. You may configure up to four devices, screen or camera, as inputs. In the Kaltura Lecture Capture Home Page, the default selection is a camera as the Primary Video and the screen as the Secondary Video. You can use the settings to configure the quality of recording, or choose a different recording input. You can either remove inputs completely or disable them for a specific recording by clicking on the input icon.
By default, all inputs are configured to the highest quality available, so you can just start recording. If you would like to change any of the settings for the camera, screen or audio, please use the following information to modify the configuration settings.
Check Your Audio Settings
Run a quick audio test by saying your name or welcoming your students to the class as you would during your lecture. Make sure the green bars, in the Audio section of the screen, move up and down and are at high levels.
If bars don't show, are low, or don't change as you speak, return to the touch panel audio tab.
Check Camera Settings
Make sure you can see the video from the room in the Primary Input area (left side of the screen).
If you don't see an image, return to the touch panel camera tab.
Record Your Lecture:
Select the pencil icon next to "New Recording" to add a title to your video. Also make sure you add your Myid in the "User ID/Name" field to the video can be linked back to you or your course.
 Image Removed
To begin recording, select the large red recording button on the middle of the screen. You will be able to pause, and stop recordings by pressing the same area. You may also minimize the application once you recording is running.
Completing and uploading video recording
After you "stop" your recording, you will be directed to the entry page. If you clicked stop by mistake, you can always click cancel and you will be returned to your recording in a paused state. If you want to complete the recording, make sure you have entered the title of the recording and your myid in the User Name field.
As a default, your videos will be saved and uploaded the Kaltura's server after you stop and end your recording session. If prompted, do not select Delete or X to delete your entry.
 Image Removed
Saving and Uploading your Recording
After you “Stop” recording, the following message is displayed.
The process of uploading your recording is seamless. The following message is displayed: “The final message that your recording was saved successfully.”
Your recording is automatically uploaded to your Kaltura account (to the user specified in the “User ID” field in the recording details screen).
Upload is done in the background regardless of the user that is logged in. After you save your recording, you can start a new one or log off and the recording will continue to upload.
| title | In-Person Attendance Groups |
|---|
|
Attendance groups for Fall 2020 will be up to instructors to assign. However, some units may decide to assign en masse. One tool to assist in the management of these groups is the eLC groups tool. For example, groups can be set to self-enroll. You can share communication and resources with these groups via the groups discussion board. Also, see this resource on sign-up sheets in eLC. Watch the quick video tutorial. |
| Expand |
|---|
| title | Add recording to your eLC Course |
|---|
|
| Include Page |
|---|
| Add a recording to eLC |
|---|
| Add a recording to eLC |
|---|
|
|
...
| Expand |
|---|
| title | Video Proctoring Software (Respondus Monitor) |
|---|
|
Respondus Monitor is a webcam feature for LockDown Browser. Respondus Monitor records students during online quizzes/exams. When Respondus Monitor is set up for a quiz/exam, students are required to use a webcam and microphone in addition to LockDown Browser. After the quiz/exam is complete, an instructor is able to review details of the assessment and the students’ activities during the quiz/exam. The following system requirements should be met for students: Windows: 10, 8, 7 Mac: OS X 10.12 or higher iOS: 10.0+ (iPad only). Must have a compatible eLC integration. Web camera (internal or external) & microphone A broadband Internet connection
Resources: Remove the description field for all zoom generated video. This description will trigger an “access denied” error when videos are linked to your eLC course. EITS is looking into a way to remove the description automatically but for now this is the best workaround. See video below: http://www.kaltura.com/tiny/jfxzo |
| Expand |
|---|
| title | Remove Zoom Video Description |
|---|
|
|